Skip to content

Choosing the correct bike frame size is crucial for riding comfort and performance. Whether you’re a beginner or upgrading to a carbon fiber bike frame, mastering the scientific measurement methods and industry terminology helps you avoid pitfalls and enhances your cycling experience.
Bike frame sizes are more than just numbers — they involve core parameters like seat tube length, top tube length, and standover height. In Western cycling communities, terms like frame fit or bike fit describe the match between frame and rider, directly impacting riding posture, control, and comfort.

This guide explains how to use a tape measure to determine your bike frame size and the differences between measuring mountain bike frame size and road bike frame size. By combining height and inseam measurements, you can scientifically determine bike frame size and find your ideal “sweet spot.”
Understanding what size bike frame fits you best is key to avoiding frames that are too large or too small. With over a decade of experience manufacturing carbon fiber bike parts, I deeply understand how precise frame sizing affects both riding performance and frame longevity.
Next, we will break down the measurement steps and share industry jargon and practical experience to help you easily master bike frame size measurement and build the best cycling setup.

Importance of Measuring Bike Frame Size
Whether you ride a mountain bike or a road bike, having the correct bike frame size is fundamental to comfort, efficiency, and safety. The wrong size frame can prevent you from finding the right bike fit and may cause back, knee, or wrist pain.
In Western cycling culture, a poor fit is often called a “poor bike fit.” This commonly happens when riders blindly choose sizes based on height or brand labels (like S/M/L) but ignore key measurements such as seat tube length, top tube length, and standover height. This is especially critical for carbon fiber frames which require precise matching due to their responsive and stiff nature.
How Frame Size Affects Comfort and Performance
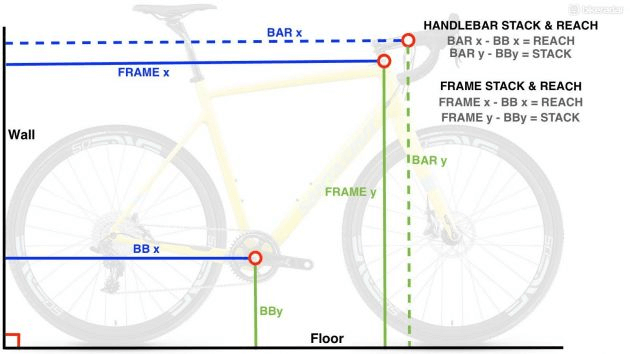
The right bike frame size height allows you to maintain a natural riding position, reducing strain on your neck, back, and wrists. When measured accurately, reach (horizontal distance) and stack (vertical height) perfectly suit your body structure, improving pedaling efficiency and control.
-
Frame too large: causes excessive forward lean and back strain.
-
Frame too small: leads to over-bent knees and inefficient pedaling.
Common Frame Size Issues
Many beginners don’t know how do you measure a bike frame for size and face problems like:
-
Ignoring inseam length, resulting in improper standover height.
-
Relying only on height without considering body proportions.
-
Not knowing how to determine size of bike frame, leading to discomfort.
-
Ordering online without test riding and mismatching frame geometry.
Therefore, we always recommend that whether you’re new or experienced, learning the correct method of how do you measure for a bike frame is essential to avoid costly mistakes.

How Do You Measure Bike Frame Size?
Accurately measuring your bike frame size is the first step to ensuring a great riding experience, performance, and safety. In Western markets, the question “what size bike frame should I ride?” is one of the most common for beginners. Whether you’re buying a road bike, mountain bike, or commuter bike, knowing how do you measure the frame size on a bike is crucial.
What is Bike Frame Size?
Bike frame size usually refers to the vertical length from the bottom bracket (midpoint of the crankset) to the top of the seat tube. This is also called seat tube length and is commonly measured in centimeters or inches depending on the bike type and origin.
-
Road bikes typically use centimeters (e.g., 52cm, 56cm).
-
Mountain bikes usually use inches (e.g., 17″, 19″).
A frame bike size guide correlates rider height and inseam length with frame size, providing intuitive sizing references.
Note: A “56cm” frame from different brands may not have identical geometry, so understanding frame geometry is more important than the number alone.

Traditional Measurement: Bottom Bracket to Seat Tube Top
This is the most basic and easiest method, widely used for beginner assessment and initial bike selection.
-
Start point: Center of the bottom bracket.
-
End point: Top of the seat tube or seat tube/top tube junction (varies by brand).
How to measure the frame size on a bike:
-
Use a tape measure to measure vertically from the bottom bracket center to the seat tube top.
-
Record the length in cm or inches.
-
Compare with manufacturer size charts or general references.
Common pitfalls:
-
Sloping top tubes (common in mountain bikes) can cause underestimation of usable space.
-
Ignoring Effective Top Tube or Reach metrics can cause poor fit.
-
Older frames sometimes use center-to-center measurements, causing confusion.

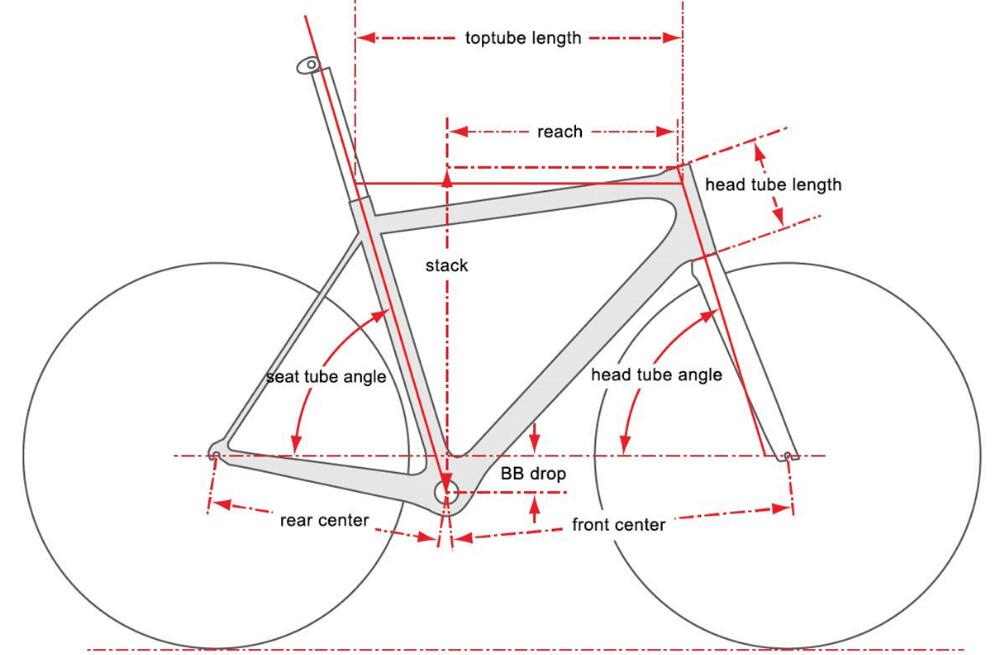
Modern Measurement: Effective Top Tube Length
As frame geometry diversifies, top tube length is considered a better indicator of “riding space,” especially in Western professional circles.
Why choose this metric:
-
Seat tube length doesn’t accurately reflect fit on sloped top tube frames.
-
Better suited for different body types.
-
Allows better comparison of geometry differences across brands.
Measurement method:
-
Find the head tube center.
-
Find the seat tube center (along horizontal plane).
-
Measure horizontal distance between these points (in cm).
This data directly influences reach, affecting handling and comfort.
Other Key Parameters
Standover height:
-
The vertical distance from the ground to the top tube.
-
When standing over the bike, leave 2–5cm clearance (more on mountain bikes) to avoid injury during sudden stops or dismounts.
-
A key reference to judge bike frame size height fit.

Frame geometry basics:
-
Head tube angle: impacts handling responsiveness.
-
Chainstay length: affects acceleration and stability.
-
Stack & reach: core fit measurements determining your “fit window.”
How to Determine Bike Frame Size Based on Height and Inseam
If you can’t test ride, estimating frame size using height + inseam is common among Western cyclists:
General formula (for road bikes):
-
Road bike frame size (cm) ≈ inseam length × 0.67
-
Mountain bike frame size (inch) ≈ (inseam length × 0.66) ÷ 2.54
For example, a rider with an 80cm inseam fits a road bike around 53–54cm frame size.
Why is this better than using height alone?
-
Two people both 175cm tall can have very different inseam lengths.
-
Bike frame size height is a basic estimate; inseam length is more decisive.
-
Use with bike chart frame size for more accurate sizing.

Measuring Frame Size for Different Types of Bikes
Different types of bicycles have significant differences in frame geometry and intended use, so when measuring and choosing a bike frame size, one size does not fit all. Correctly understanding the sizing standards for each type of bike is a key step in answering the question “how do you measure a bike frame for size.”
Still unsure whether going bigger or smaller is better? Read our “Is It Better to Have a Bigger or Smaller Bike Frame?” guide for detailed insights.
Mountain Bike Frame Size Measurement
Differences Between Mountain Bike and Road Bike Frames
Mountain bikes (MTB) are designed with emphasis on maneuverability, suspension travel, and obstacle clearance. Their frame geometry is generally shorter and taller, often featuring sloping top tubes, thicker seat tubes, and longer front forks. This means frame size cannot be judged solely by seat tube length.
Moreover, mountain bikes pay more attention to standover height and reach, which help with trail riding, downhill, and off-road conditions.
Characteristics of Mountain Bike Frame Size Guide
-
Commonly use inches as units (e.g., 15″, 17″, 19″), with some brands also using S/M/L sizing;
-
Different geometries (e.g., trail bikes vs. cross-country) may lead to the same rider fitting different sizes;
-
Recommended to use height and inseam measurements with a bike chart frame size guide, combined with test rides within your “fit window.”
Application of “Large Bike Frame Size” in Mountain Bikes
A “Large” frame size is usually suitable for riders taller than 180cm. Common height-to-frame-size references in the Western market are:
| Height Range | Suggested Frame Size |
|---|---|
| 160–170cm | 15″–16″ / S |
| 170–180cm | 17″–18″ / M |
| 180–190cm | 19″–20″ / L |
| 190cm+ | 21″+ / XL |
Note: Different brands have varied definitions of “L” sizes (e.g., Trek, Specialized, Giant), so prioritize the brand’s own frame size guide.
Road Bike Frame Size Measurement
Road Bike Frame Features and Sizing Focus
Road bikes focus on lightweight construction, aerodynamics, and pedaling efficiency. Their frames are longer and steeper in angle, designed for long-distance rides, high-speed cycling, and racing.
Key sizing considerations:
-
Seat tube length: Usually in centimeters (e.g., 52cm, 54cm, 56cm);
-
Top tube length: Determines the “reach”;
-
Stack: Determines whether the riding position is comfort/endurance or aggressive/race oriented.
Professional Terms for Road Bike Frame Sizes
-
Endurance geometry: Suitable for long rides, with a taller head tube and more upright posture;
-
Race geometry: Designed for aggressive riding, strong forward lean, and aerodynamic positioning;
-
Compact frame: Common in modern carbon frames with sloping top tubes, where Effective Top Tube length is key for size assessment.
For road bikes, the best way to measure bike frame size combines height, inseam, and reach/stack data.
Brief Overview of Other Bike Frame Sizes
Hybrid Bikes and City/Comfort Bikes
These models combine features of mountain and road bikes and suit commuting, fitness, or casual riding. Their sizing principles include:
-
Mostly S/M/L sizing, with a higher tolerance for size variation;
-
Standover height and an upright riding posture are prioritized;
-
Frame geometry tends to be more “forgiving,” so beginners don’t need to obsess over perfect fit.
Electric Bikes (E-Bikes)
E-bike sizing generally follows hybrid or city bike logic. However, due to motor and battery placement, the riding position may be higher or heavier, so on-site test rides combined with frame size guides are recommended.
Tip: Different bike types have different sizing standards and fitting logics—there is no universal formula. Before purchase, always combine brand geometry charts, your body type, and if possible, professional bike fitting or test rides to finalize your choice.

Tips and Tools for Accurate Measurement
To answer “how do you measure bike frame size correctly,” simply estimating height and inseam is not enough. Whether shopping online or in-store, mastering some practical measuring tips and tools will significantly improve your selection process and riding comfort.
Recommended Measurement Tools for Bike Frame Size
In Western markets, many local bike shops (LBS) and bike fitting studios use specific devices to help determine frame size. For most users, the following tools suffice:
Basic Measurement Tools:
-
Tape Measure: Most common, used to measure seat tube, top tube, standover height, etc.
-
Spirit Level: Ensures horizontal accuracy when measuring effective top tube length.
-
Book or Coin for Inseam Measurement: Placed between the legs to simulate saddle height when measuring inseam.
Advanced Measurement Tools:
-
Laser Distance Meter: Highly accurate, used for quick standover height measurements.
-
Bike Fit Jig: Used in professional fitting studios to simulate stack/reach and adjust posture.
-
Digital Angle Meter or Geometry Analysis Tools (e.g., Velogicfit): Records frame and joint angles precisely, suited for advanced cyclists or custom frames.

How to Measure Bike Frame Size at Home (DIY Measurement)
For those who cannot visit a shop or test ride, DIY measurement at home is the most practical option. Here is the standard process:
DIY Measurement Steps:
-
Measure Inseam Length:
-
Wear cycling shorts or tight-fitting pants;
-
Stand against a wall with feet slightly apart, place a book snugly between your legs at the crotch;
-
Measure the vertical distance from the book’s bottom to the floor (in cm).
-
Estimate Frame Size:
-
Use the general formulas:
-
Road bike frame size (cm) ≈ Inseam × 0.67
-
Mountain bike frame size (inch) ≈ (Inseam × 0.66) ÷ 2.54
-
-
Cross-check with brand bike frame size guides or charts and your height and inseam to preliminarily select sizes like M, L, 54cm, or 56cm.
-
Supplementary Measurement of Effective Top Tube:
-
If you have access to an old bike or friend’s bike for reference, measure the horizontal distance from head tube center to seat tube center;
-
This affects the reach and is a key factor for riding posture comfort.
Frame Fitting Tips for On-Site Test Riding
When test riding at a store, beyond how the bike feels, consider these professional fit points:
Frame Fit Key Checks During Test Ride:
-
Standover Height: When standing over the top tube, allow 2–5 cm clearance;
-
Saddle Position: When seated, knees should be naturally bent with the foot’s ball on the lowest pedal point, and the heel can comfortably touch the pedal;
-
Reach: Hands on the handlebars should allow relaxed shoulders without wrist strain;
-
Stack: Ensure the head and back don’t experience excessive pressure.
Common Industry Fit Tests:
-
Three-point check: Natural alignment of foot, hip, and hands without forcing posture;
-
KOPS test (Knee Over Pedal Spindle): The knee aligns over the pedal spindle at the lowest pedal position;
-
Fit window match: Confirm the bike’s geometry falls within your ideal fit range according to the geometry chart.
Tip: Try riding different sizes, even if only differing by 2 cm in frame height, as the difference can be significant.
How to Determine If Your Bike Frame Size Is Right
After choosing a bike that seems to fit, many people ask: “What size bike frame fits me best?” In fact, beyond height and formulas, the truly suitable frame size needs to be validated through actual riding experience. This section will help you judge whether your current frame matches your body through several professional yet simple methods.
Riding Feel: “Right” or Just “Okay”?
A truly fitting bike doesn’t require you to “get used to it”; you should feel natural and stable right away. The following points can serve as intuitive criteria:
Signs the frame is too large:
-
Arms stretch too far forward, causing shoulder tension and wrist soreness;
-
Riding posture leans too far forward, feeling like you’re “pressing” on the handlebars;
-
Steering feels sluggish, hard to turn at low speeds;
-
After 10 minutes, neck or lower back discomfort appears.
Signs the frame is too small:
-
Knees nearly touch or hit the top tube during pedaling;
-
Elbows forced inward, cramped riding posture, feeling confined;
-
Front wheel lifts easily uphill, poor stability;
-
Difficulties mounting/dismounting due to hitting the top tube.
If you feel awkward or need to force yourself to adapt to the bike at normal saddle height, the frame size is likely off.

Standover Height Check
Standover height is one of the most straightforward ways for beginners to judge if the frame is too big. Commonly used steps in Western cycling communities:
How to measure:
-
Find flat ground and place the bike upright;
-
Stand over the bike with the top tube between your legs;
-
Feet flat on the ground, standing naturally;
-
Use a tape measure to measure the vertical gap between the top tube and your crotch.
Recommended clearance:
-
Road bike: about 2–3 cm (0.8–1.2 inches);
-
Mountain bike: at least 5 cm (2 inches+) to avoid hitting on descents;
-
City/comfort bike: no strict requirement but recommended to have 2 cm or more clearance.
If the top tube fully contacts or presses into your crotch, the frame is clearly too large and not recommended.
How to Fine-Tune: Your “Frame Size Fit Window”
Even if the frame roughly fits, you can still make micro-adjustments to the cockpit area to ride more comfortably. This is called “Fit Window Optimization” in the West.
Adjustable items include:
-
Changing to a different stem length;
-
Adjusting handlebar and saddle height and fore/aft position;
-
Using adjustable-angle seatposts;
-
Adding spacers to raise or lower handlebar height (stack).
If you can make the bike comfortable within a “reasonable range” using these adjustments, the frame size is suitable.

Frequently Asked Questions (FAQs)
Q1: How do you measure for a bike frame?
There are two main measurement methods depending on brand and bike use:
-
Method 1: Bottom Bracket to Seat Tube Top (Traditional)
Common for mountain bikes and some city bikes. Use a tape measure vertically from the bottom bracket center to the seat tube top, in inches or centimeters. -
Method 2: Effective Top Tube Length
More common for modern road, gravel, and e-bikes. Measure the horizontal distance from the center of the head tube to the center of the seat tube. This affects your reach and fit window.
Tip: Keep the frame level and tape measure tight for accuracy.
Q2: How to use bike frame size charts?
Bike size charts help quickly match your height to recommended frame sizes across brands/models. Example:
| Height (cm) | Road Frame (cm) | MTB Frame (inch) |
|---|---|---|
| 160–165 | 50–52 | 15–16 |
| 166–172 | 52–54 | 16–17 |
| 173–178 | 54–56 | 17–18 |
| 179–185 | 56–58 | 18–19 |
| 186–192 | 58–60 | 19–20 |
Note: Each brand (Trek, Specialized, Giant) varies in geometry, so charts are just a starting point; confirm with inseam and stack/reach.
Q3: How to determine your bike frame size?
Key steps:
-
Measure height and inseam (e.g., inseam × 0.67 for road bike frame size in cm).
-
Consult brand-specific frame size guides to avoid generic errors.
-
Confirm stack & reach fit with your current or ideal bike geometry.
Q4: Are S, M, L sizes standardized and equal to cm sizes?
No. S/M/L simplify size ranges, but cm/inch sizes vary by brand and geometry (race vs endurance). Use geometry data + your body for best fit.
Q5: Is it better to buy a frame slightly smaller or larger?
Generally, smaller is better, especially for beginners or less flexible riders. Small frames can be adjusted with longer stems and higher seatposts; large frames limit adjustment and may force poor posture.
Q6: How should women or teens choose sizes?
Women often have longer legs and shorter torsos:
-
Consider women-specific (WSD) geometry;
-
Frames with shorter reach and higher stack;
-
Adjust handlebar and stem length for fit.
Teens should allow growth room but avoid too large frames for safety and posture.

Conclusion & Expert Tips
In recent years, the rise of custom carbon fiber bicycle frames: how to get perfect fit and design has revolutionized the cycling industry, providing riders with tailored solutions that maximize comfort, performance, and aesthetics.
Choosing and measuring the right bike frame size ensures riding comfort and efficiency. From understanding what frame size means to learning how to measure and judging based on height, inseam, and bike type, each step requires a balance of data and feel.
Different bikes require different measurement logics: mountain bikes prioritize standover height; road bikes rely on top tube length and geometry charts. Many Western riders use “fit window” to fine-tune their cockpit area for personalized comfort.
For carbon fiber frames, since they can’t be easily modified, choosing the right size upfront is critical—better to err slightly smaller and adjust cockpit components later.
Contact Us:
With 10+ years of experience in carbon fiber bike parts design and manufacturing, we provide OEM/ODM services for global brands. For expert advice, custom development, or bulk purchase support, please contact us via our website or email. We offer one-on-one product consulting and sizing recommendations to help every rider find their perfect frame solution.
The right frame is the most comfortable distance between you and the road — we’re glad to be your professional partner on this journey.