Choosing the right road bike frame size is never as simple as matching your height to a chart. Whether you’re trying to figure out how do you measure a road bike frame size or debating whether a smaller or larger frame is better, sizing is one of those things that even experienced riders get wrong. As many U.S. fitters like to say, “Fit first, frame second.” In other words, the frame should match your body—not the other way around.
Data from CompetitiveCyclist (a well-known U.S. bike-fit platform) shows that seat tube length, effective top tube, and Reach/Stack are now the core metrics that determine proper fit. That’s why the old-school “52/54/56 cm” labels no longer tell the full story. Google Trends also indicates a steady rise in searches for how to measure a road bike frame, how to measure for a road bike frame, and road bicycle frame size guide, reflecting how riders are paying more attention to geometry rather than just frame size tags.
We’ve seen firsthand how the wrong size can sabotage a rider’s efficiency and comfort. Poor sizing can throw off knee tracking, hip stability, and even create what mechanics call the “dead-zone pedal stroke.” Understanding how to measure a road bike frame isn’t just about numbers—it’s the foundation of a safe, efficient, and enjoyable ride.
How Do You Measure a Road Bike Frame Size? Standard Methods for Accurate Sizing
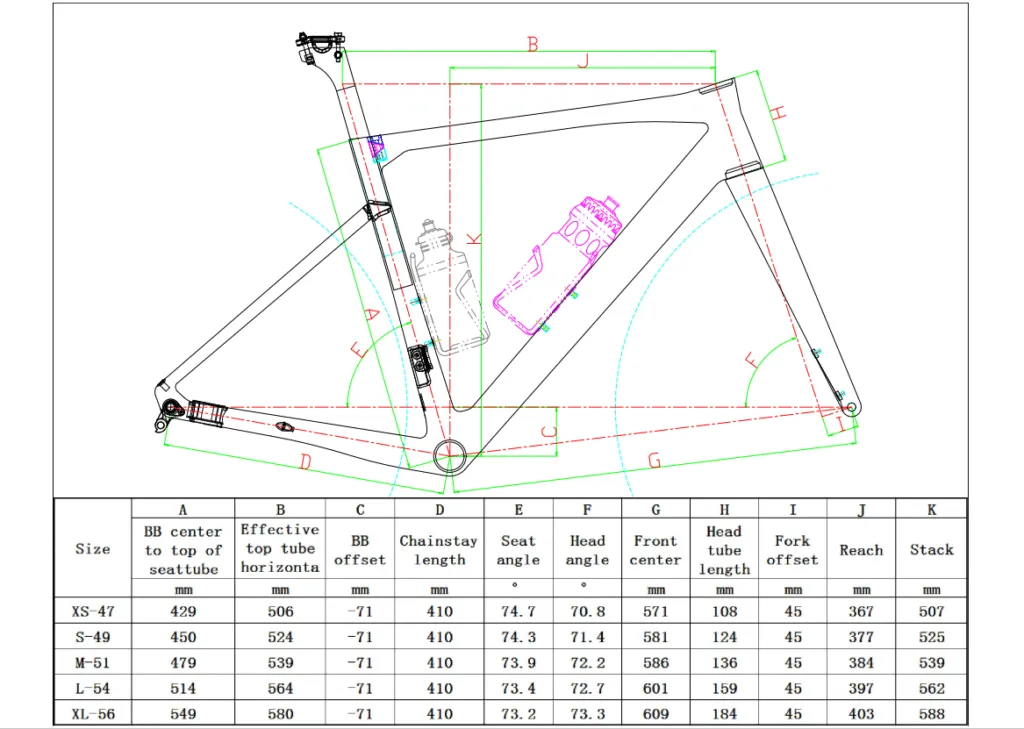
Getting the correct measurements is the foundation of how to measure a road bike frame, especially as modern geometry relies on more than just the classic “52/54/56 cm” labels. Today’s fit standards use precise geometric numbers—often called the “hard numbers” in the industry—to ensure a rider gets the right frame for their body and riding style. The following methods are widely used by U.S. fitters and manufacturers and form the core of any road bicycle frame size guide.
1. Measuring the Seat Tube Length — The Most Traditional Frame Size Reference
This is the starting point of how to measure road bike frame sizing. Seat tube length is measured either center-to-top (C-T) or center-to-center (C-C). While it gives a quick reference to a frame’s “nominal size,” modern compact frames, curved seat tubes, and integrated clamps make this number less decisive. Many fitters casually call it a “reference, not a fit number,” meaning real sizing requires more than seat tube height alone.
2. Measuring the Effective Top Tube (ETT) — The Most Important Modern Fit Dimension
Effective top tube determines your reach to the handlebars and is the key factor behind whether a bike feels stretched out or cramped. For riders with long torsos or shorter upper bodies, this number directly affects comfort. Many U.S. fitters even refer to ETT as “the real size of the bike” because it reflects actual riding posture far better than seat tube length.
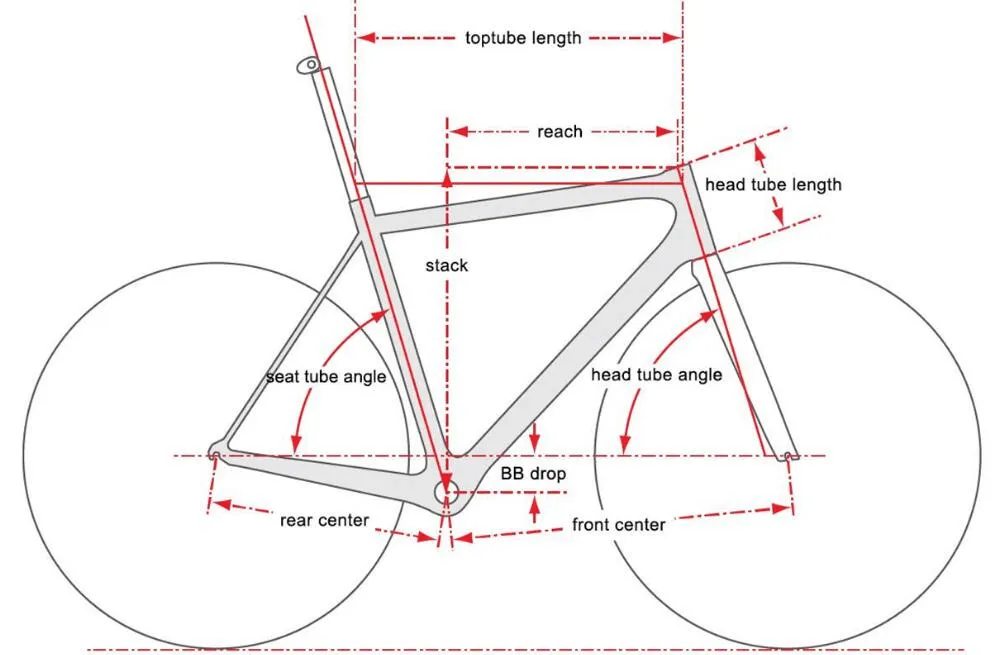
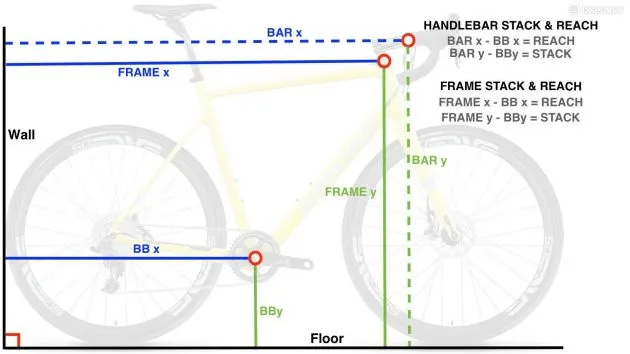
3. Measuring Reach and Stack — The Core Geometry for Professional-Level Fit
Reach and Stack are the advanced metrics in how to measure for a road bike frame and are considered “non-negotiable numbers” by many professional fitters.
-
Reach defines your horizontal cockpit length.
-
Stack defines handlebar height relative to the bottom bracket.
These two numbers allow you to compare frames across brands and avoid the classic issue: “same size on paper, totally different on the road.”
4. Measuring Front-Center and Other Key Geometry from Bottom Bracket to Head Tube
Front-center, BB drop, and fork rake are critical for stability and handling—especially for aggressive descenders and long-distance riders. Too-short front-center can cause toe overlap, known among riders as the “toe strike issue.” Although often overlooked, these measurements play a major role in fine-tuning the ideal frame size in any road bicycle frame size guide.

How to Measure a Road Bike Frame? Accurately Assessing Your Body for the Right Fit
Choosing the right road bike frame isn’t just about the labeled size—it’s about matching your body measurements to the bike’s geometry. Accurate measurement prevents knee overreach, lower back strain, and unstable riding positions. U.S. fitters often say, “fit first, numbers second,” highlighting that your body should guide frame selection. The following steps show how core measurements can determine the most suitable road bicycle frame size guide.
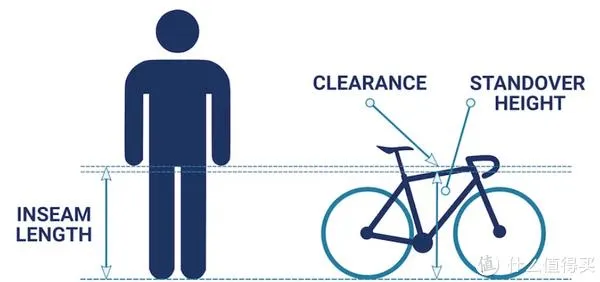
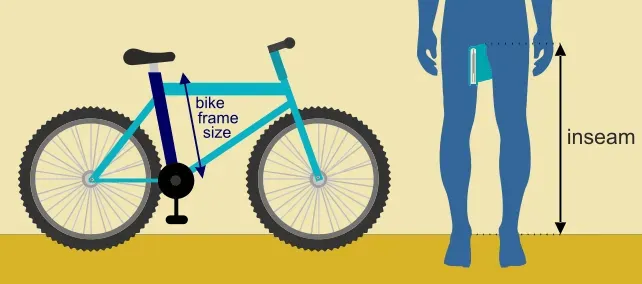
1. Inseam Measurement: Establishing Your Base Frame Range
Inseam length is the first step in identifying your proper frame size. Measure from the floor to the crotch center to estimate the appropriate seat tube length. Even with curved seat tubes or compact geometries, this number remains a key reference to avoid a “too high saddle” or unstable pedaling.
2. Height + Torso Ratio Determines Your Reach
Height alone doesn’t dictate frame size—torso length, shoulder width, and arm span directly affect Reach. Correct Reach reduces forward lean and shoulder/neck strain, preventing the “overstretched position”. This metric is essential when learning how to measure for a road bike frame.
3. Riding Style Influences Frame Choice (Racing/Endurance/Commuting)
Riding style affects ideal frame geometry. Racers prefer slightly smaller, compact frames for agility; endurance or long-distance riders often choose slightly larger frames with higher Stack for comfort; commuters prioritize upright posture and stability. Combining how to measure a road bike frame techniques with your riding style ensures both efficiency and comfort.

Road Bicycle Frame Size Guide – Quick Reference for Proper Fit
Knowing your frame size is just the first step. Avoid the common pitfalls highlighted in our blog, “Road Frame Size Chart Myths: 5 Mistakes Riders Make When Choosing a Bike,” to ensure you don’t fall into sizing traps. Matching your frame to your height, riding style, and geometry determines comfort and efficiency. This road bicycle frame size guide helps riders quickly reference common sizes, choose the right geometry, and balance racing, endurance, or commuting needs. Using it prevents unstable pedaling, shoulder strain, or awkward posture, following the fitter’s principle: “fit first, frame second.”
1: Common Height-to-Frame Size Chart (49/52/54/56/58cm)
Based on height and inseam, you can narrow down frame ranges. For example, 165–170 cm → 49–52 cm, 175–180 cm → 54 cm, 185 cm+ → 56–58 cm. In U.S. and EU bike shops, this is called a “quick fit chart”—a fast reference—but should be fine-tuned using Reach and Stack.
2: Recommended Sizes for Racing, Endurance, and Commuting
Racing favors slightly smaller, compact frames for agility; endurance rides prefer slightly larger frames with higher Stack for comfort; commuting prioritizes upright posture and stability. This approach helps avoid dead-zone pedal stroke and shoulder/neck strain.
3: Adapting to Different Frame Geometries (Aero, Endurance, Climbing)
Frame geometry affects posture and handling. Aero frames: lower top tube, longer Reach for speed; Endurance: shorter top tube, higher Stack for comfort; Climbing: lightweight, longer front-center for uphill stability. Using a road bike fit calculator or manufacturer’s guide ensures the best match for body and riding style.
| Frame Type | Top Tube Length | Stack Height | Key Feature / Benefit | Recommended For |
|---|---|---|---|---|
| Aero | Lower | Moderate | Longer Reach for speed | Racing / Fast riding |
| Endurance | Shorter | Higher | More upright, comfortable ride | Long-distance / All-day comfort |
| Climbing | Moderate | Moderate | Lightweight, longer Front-Center | Steep climbs / Stability |
Is It Better to Have a Smaller or Larger Frame?
Many riders struggle with whether to choose a smaller or larger road bike frame. The right choice affects comfort, handling, pedaling efficiency, shoulder and neck load, and knee angles. Understanding how do you measure a road bike frame and frame geometry helps make a data-driven decision when fine-tuning your fit. The following sections analyze when a slightly smaller or larger frame makes sense and the risks of choosing the wrong size from an engineering perspective.
1: When to Choose a Slightly Smaller Frame (More Flexibility, Adjustable Cockpit)
Slightly smaller frames are more flexible, ideal for riders who frequently adjust handlebars or saddle height, and for racers who need precise handling. Fitters call this “race fit flexibility,” allowing quick adjustments for arm length and torso reach while reducing overextension or excessive forward lean.
2: When to Choose a Slightly Larger Frame (Tall Riders, Extended Posture)
Tall riders or endurance riders who prefer a more stretched-out posture benefit from a slightly larger frame. A larger frame provides higher Stack and longer Reach, supporting a comfortable upright or mildly forward-leaning posture for long rides or endurance events. However, handlebar and saddle adjustment range is limited, and oversizing may reduce handling responsiveness.
3: Engineer’s Perspective: Why Most Riders Opt for Slightly Smaller Rather Than Larger
From a manufacturing and mechanics perspective, slightly smaller frames are easier to adjust to human proportions while maintaining pedaling efficiency and stability. Oversized frames, even if height-appropriate, can lead to excessive forward lean, overextended knees, or sluggish handling—commonly called “oversized risk” in the industry.
4: 10+ Years of Manufacturing Experience: Risks of Oversized Frames Exceed Undersized Ones
Based on carbon frame design experience, oversized frames are more likely to cause unstable handling, reduced power transfer, and improper knee angles. Slightly smaller frames can be fine-tuned with stem, handlebar, and saddle adjustments while keeping a natural riding posture and optimized power output, making this the preferred strategy recommended by most professional fitters.
How to Tell if Your Current Frame is the Wrong Size (Common Warning Signs)
Even if you’ve measured your height and inseam, it doesn’t guarantee a perfect fit. A poorly sized frame affects pedaling efficiency, posture, and comfort. Observing knee position, shoulder/neck strain, and saddle adjustment range reveals if the frame suits your body. Recognizing these road bike fit signs helps prevent dead-zone pedal stroke and tension in shoulders or back.
1: Knees Too Far Forward or Back
Knee position during pedaling is a key fit indicator. Knees far beyond toes suggest a too-large frame or forward saddle; knees too far back suggest a too-small frame or rearward saddle. Fitters call this the “knee over pedal indicator,” guiding seat tube and saddle fore/aft adjustments.
2: Handlebars Too Low or Too Far, Causing Shoulder/Neck Pain
Improper handlebar height and Reach can cause shoulder, neck, or wrist discomfort. Too low or far often points to low Stack or a long top tube, requiring stem adjustment or re-evaluation of frame geometry. Fitters term this “extended cockpit discomfort.”
3: Saddle Adjusted to the Limits Still Feels Wrong
If the saddle can’t achieve a comfortable pedaling angle even at max/min adjustment, the frame is likely mismatched. Seat tube length or effective top tube may limit positioning. This common road bike fit failure indicates the need for a better-sized frame or different geometry.